Author Archives: Chris Johnson

About Chris Johnson

Chris is an avid developer, speaker and is the General Manager of Provoke Solutions Inc. a Microsoft Gold Partner in Seattle WA that is one of the world's most renowned and sought-after online experience consultancies. Provoke Solutions specialize in software solutions for SharePoint and the Microsoft technology stack (http://www.provokesolutions.com). In Nov 2011 Chris left Microsoft Corporation after nine and a half years where he most recently was a Senior Technical Product Manager for the SharePoint product group in Redmond Washington managing SharePoint’s professional developer audience technical marketing programs. Chris moved to Redmond in 2007 to work in the software engineering team on the SharePoint 2010 release after working for Microsoft New Zealand. In New Zealand he consulted to customers across the Asia Pacific region on designing and implementing Content Management Server and SharePoint deployments. Chris’ background is in Microsoft software development and enjoys all things technical. He is a speaker at numerous conferences around the world such as Tech.Ed, SharePoint Best Practices Conference, SharePoint Connections and the world wide SharePoint Conference. Chris holds a Bachelor of Computer Science & enjoys throwing himself out of perfectly good airplanes from time to time. Chris blogs and can be contacted via www.looselytyped.net

Simplifying Office 365 Unified API calls with Postman and OAuth 2

The Office 365 Unified API at graph.microsoft.com is a nice API to work with Azure AD and Office 365 from a single API endpoint. Authorized via OAuth 2 flows and all REST/JSON etc… Pretty much as you would expect as a developer.

There are a few ways to play around with the API.

Simplest: Graph Explorer

Harder: Use a tool like Postman

Postman is pretty slick. It lets you craft HTTP requests, their headers, parameters, body etc… and get responses back formatted in various ways. Postman 3 also supports OAuth 2 flows to help simplify the process of authenticating against and API, so you dont need to do all the various hops and token copying between requests.

OAuth 2 + Postman + Office 365 unified API

Here is how it works.

1. Go install postman 3 first

2. Set up a GET request to get your profile details from Azure AD

GET Me

3. In the authorization area pick OAuth 2 from the dropdown
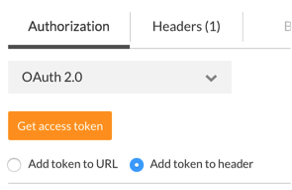
OAuth2

4. Next you need to go and register an app, if you haven’t already, in order to get a Client ID and Secret. There are instructions on doing that here.

Note: for the REPLY URL field you need to specify: https://www.getpostman.com/oauth2/callback

When complete make a note of the client id and secret as you will need them shortly.

5. Back in Postman enter the following details for each of the OAuth parameters:

Authorization URL: https://login.windows.net/common/oauth2/authorize?resource=https%3A%2F%2Fgraph.microsoft.com
Access Token URL: https://login.windows.net/common/oauth2/token
Client ID: (the one you got in the previous step)
Client Secret: (the one you got in the previous step)

Notice at the end of the Authorization URL you need to include the “resource” parameter. This is required with O365 and indicates what endpoint you are trying to get access to.

6. Click the “Get access token” button to initiate the authentication and authorization flow. Postman will pop up a window that will direct you to log into Office 365 and let you consent to the application being given the appropriate privileges.

When complete you will see the OAuth access token, scopes etc… that were returned.
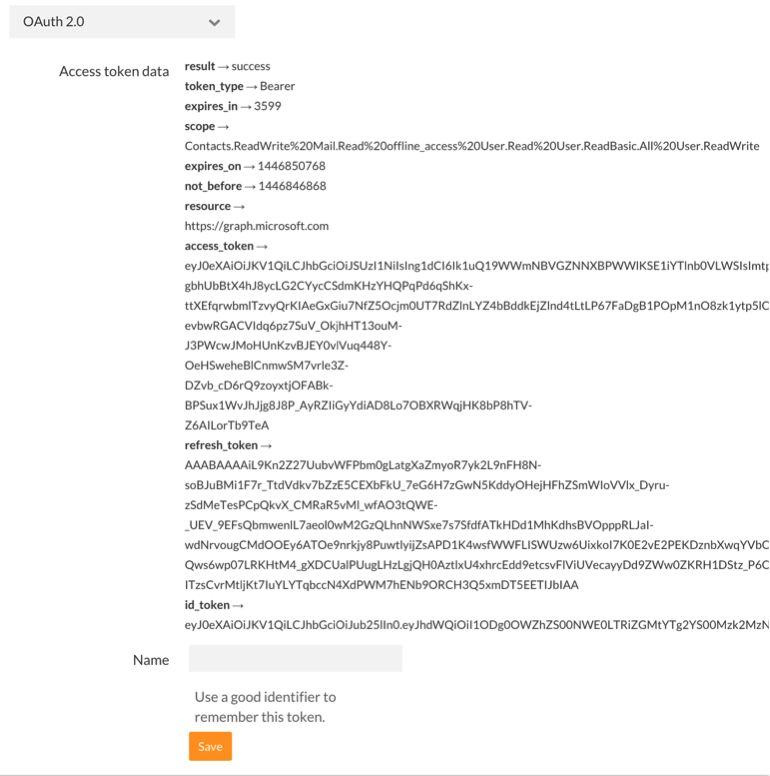
AccessTokens

Type in a name for this token and save it. Then for all subsequent requests you can attach that token to your request like this.

1. make sure your URL is set
2. attach the token to the header of the request
3. execute the request
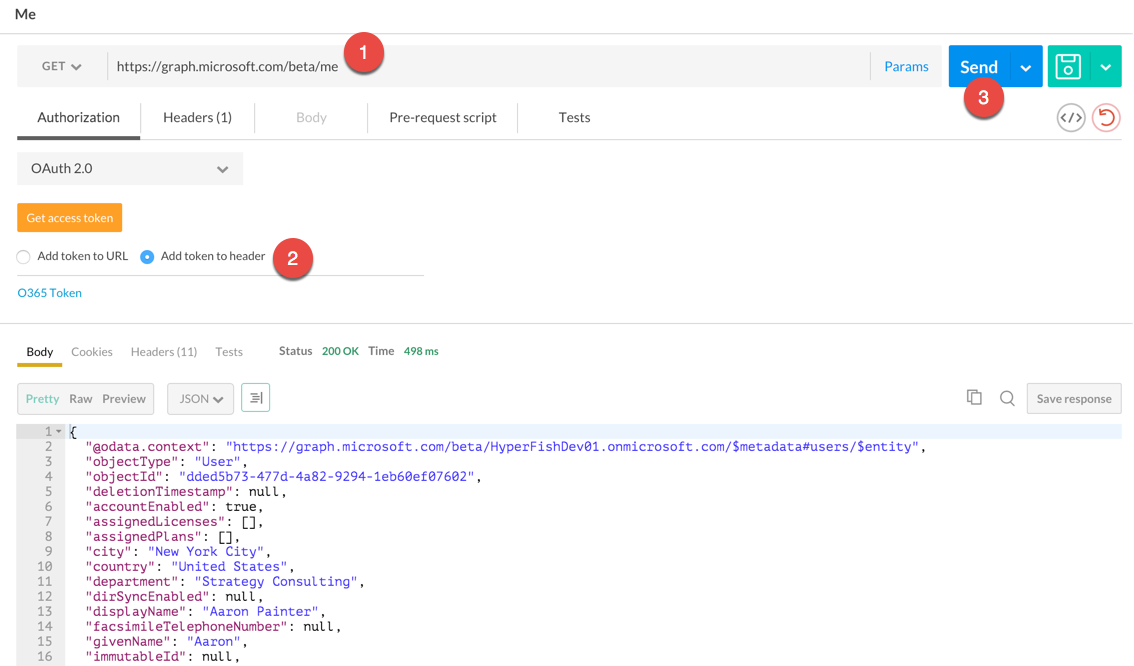
MeR equest Results

All things going well you will get back a nice JSON response with your profile information included.

Hopefully helps simplify calling the graph.microsoft.com endpoint, playing with requests and not having to deal with all the icky OAuth goo along the way.

Happy coding!

Bro Down

Microsoft Cloud Show: Episode 101 | Reflecting on the First 2yrs and 100 Episodes of the Show

We just posted a new podcast episode!

This 101st episode, AC and CJ look back on the first two years and 100 episodes of the podcast and touch on some recent news.

Be sure to download the latest episode here: Episode 101 | Reflecting on the First 2yrs and 100 Episodes of the Show.

Remember if you have a question, send it in or leave a comment.

Big Flashing DevOps Thing with Travis CI and Raspberry Pi 2

A while back I heard about Big Flashing DevOps Thing which shows you how to build a LED sign using a Raspberry Pi + BlinkyTape to display the current status of your build/deployments.  Pretty cool!

Big Flashing DevOps Thing

But at Hyperfish we are using Travis CI for our builds/tests, not Jenkins that the provided code currently supports.

Time to tweak!

The source for the original project is available on Github here: https://github.com/muce/SAWS and includes most of what you already need.  It has two parts to it:

  1. bash scripts that you schedule to download the status of a project and log it to a file
  2. a python script that reads the log files and updates the sign appropriately

To get this working with Travis CI it was a fairly simple job of tweaking a copy of the existing bash script to download the Travis build status.  Travis provides both XML or JSON feeds secured with a simple authentication token on the query string. Example below:

<Projects>
 <Project
 name="Hyperfish/hyperfish.com"
 activity="Sleeping"
 lastBuildStatus="Success"
 lastBuildLabel="48"
 lastBuildTime="2015-09-25T20:47:25.000+0000"
 webUrl="https://magnum.travis-ci.com/Hyperfish/hyperfish.com" />
</Projects>

The bash script simply downloads this feed, parses out the relevant information and then writes the appropriate color settings for the LEDs to a log file.  If the script sees the build is working it writes a number corresponding to Green in the log file.  It does this for however many repos you want to monitor.

The full travis script is here: https://github.com/LoungeFlyZ/SAWS/blob/master/travis.sh

(I have submitted a Pull Request to the original repo to add this support for Travis too)

Here is a short video of my BlinkyTape updating status and setting the lights.  In my case I set it up to monitor 3 repos in Travis, so the tape is divided into three sections to show status for each one.

Build status showing via BlinkyTape and Raspberry Pi 2

A video posted by Chris Johnson (@loungeflyz) on

This all requires a working Raspberry Pi and a basic knowledge of running scripts in Linux.  In my case I am running it with Raspbian (a Linux distro for the Pi).

Microsoft Cloud Show: Episode 098 | Recapping the News from Microsoft’s Windows 10 Device Event

We just posted a new podcast episode!

In this 98th episode, AC and CJ catch up the announcements from Microsoft’s Windows 10 Device event on October 6, 2015.

Be sure to download the latest episode here: Episode 098 | Recapping the News from Microsoft’s Windows 10 Device Event.

Remember if you have a question, send it in or leave a comment.

Microsoft Cloud Show: Episode 096 | Catching up on the Cloud News in a German Bar

We just posted a new podcast episode!

In this 96th episode, AC and CJ catch up on some of the latest cloud news with Azure and Google.

Be sure to download the latest episode here: Episode 096 | Catching up on the Cloud News in a German Bar.

Remember if you have a question, send it in or leave a comment.