The Goal: Build and deploy a really simple SharePoint App to SharePoint Online with the code running in an Azure Web Sites website.
Provider Hosted Apps are simply a SharePoint app where the code in your app runs in a space you provide. That could be Azure, AWS or wherever you like. I’m picking Azure Web Sites because its free and awesome.
Before you begin:
- Office 365 preview account (get one here for free)
- Azure Web Sites account (get one here for free)
- Visual Studio 2012 with the “Microsoft Office Developer Tools for Visual Studio 2012” add on installed (get it here for free)
Now on to the fun stuff….
Setting up an Azure Web Site:
1. Create a new Azure Web Sites site

2. When its created go into the dashboard for it and get the publishing profile for Visual Studio. Save it to your computer for later.

Setting up SharePoint Online:
1. Create a new Developer Site Collection in the SharePoint admin center.

2. Pick the Developer Site template when creating it

3. When your site has been created navigate to it. Then hit the following URL to register a new App Id and Secret. These are used for the OAuth between your App and SharePoint Online.
https://<my SPO site url>.sharepoint.com/sites/<your site collection>/_layouts/15/appregnew.aspx
4. Complete the form.
NOTES:
- Use the Generate button to create the App Id and Secret.
- Put your exact Azure Web Sites domain name in the App Domain box
- Put the HTTPS address to your site + /Pages/Default.aspx in the Redirect URI

5. Click ok and you will get confirmation the App config has been created. Make a note of all these settings someplace safe.

Creating your SharePoint App
1. Create a new SharePoint App project in Visual Studio 2012. If you don’t see this template then you don’t have the pre-reqs installed at the start of this post. Go and install the “Microsoft Office Developer Tools for Visual Studio 2012”

2. Enter the URL to your SharePoint Online development site collection and pick “Provider Hosted” from the dropdown. Click validate beside the URL to ensure you have got it right. It may prompt you to log into SharePoint online to do this.
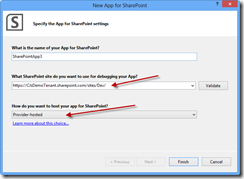
Visual Studio will create two projects in your solution:
- SharePoint project <= this is where your app config goes
- Web Site Project <= this is where your apps code and pages go
3. Right click the AppManifest.xml file and pick View Code to see the XML
4. Replace the “*” in the following line with your App Id you generated earlier
<RemoteWebApplication ClientId=”*” />
Should look something like this:
<RemoteWebApplication ClientId=”1B6B757E-1D3B-4375-8494-D885035A769B” />
5. Change the URL in the StartPage to the Fully Qualified Domain Name of your Azure site + the path to /pages/default.aspx?{StandardTokens} like this:

6. Open the Web.config file in your web project and set the ClientId and ClientSecret setting to the ones you generated previously.

7. Hit F6 to build the solution and make sure it compiles.
Deploying your App
1. Right click on the web project in the solution and Pick “Publish”

2. Click the Import button and pick the Profile file you downloaded from Azure previously. Go and download it from Azure if you were lazy and skipped this step earlier you naughty person. Validate the connection to make sure its working by clicking the Validate button.
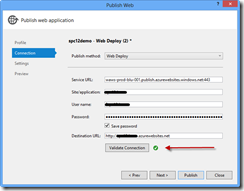
3. Click Publish and let your site deploy. When done a browser should pop up like this:

4. Go back into the Azure management dashboard and for you site click into the Configure tab. Create the ClientId and ClientSecret app settings. Azure websites reads them from here … even if you have them in your web.config. So not doing this will mean your app crashes.

Oh and remember to click the Save button at the bottom of the page when you are done (yes I failed at this a number of times)

5. In Visual Studio hit F5 to deploy your app to SharePoint Online. It will package and deploy your application.
6. You will see a browser pop open asking you if you Trust your app. OF COURSE YOU DO! 🙂 Click Trust It.

7. You will see your new app listed in the site contents. Click It!

8. Enjoy the obligatory “Working on It” screen

9. You will be redirected to your App and should see the Title of your site written to the page like this (or whatever you called your site when you created it):
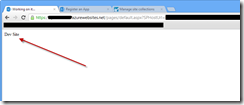
10. BOOM! Congrats you created your first provider hosted app!
In the out of the box project templates in Visual Studio it creates a default page that uses the Client Side Object Model (CSOM) to call SharePoint Online and get the Title of your web site. All the goo you set up with Ids and Secrets above is what is used by the CSOM to authenticate using OAuth with SharePoint online to ensure your code is allowed. The CSOM takes care of a lot of the heavy lifting for you so its all hidden away.
When you click your app tile in SharePoint you might have seen it redirect you via the /_layouts/15/appredirect.aspx page. This redirects you to your application via a POST along with some context about who the caller is, so that your code in Azure knows who you are & has the right tokens to call back into SharePoint as that person.
All the plumbing that makes this work is pretty detailed and way too much to cover in this post … but I suggest anyone interested read about App and OAuth in MSDN here: http://msdn.microsoft.com/en-us/library/fp142382(v=office.15).aspx
Drop a comment if you have any questions or issues!
Thanks,
-CJ
 SharePoint Intersections is a new conference happening at the MGM Grand in Las Vegas, October 27 – 30. They have a great set of sessions planned and its definitely worth taking a look at it. ASP.Net, Visual Studio, Azure and SQL Intersections all happen at the same time in the same place … so its not just a bunch of SharePoint people to hang out with too 🙂
![clip_image002[4] clip_image002[4]](http://www.looselytyped.net/wp-content/uploads/2013/06/clip_image0024.jpg)

![clip_image002[6] clip_image002[6]](http://www.looselytyped.net/wp-content/uploads/2013/06/clip_image0026.jpg)


